I just remembered that I meant to put up a post on how to make marshmallow fondant (mmf).
Difficulty rating: Easy
Take equal parts icing sugar and marshmallows. Use the best quality you can get, as the cheaper ones tend to result in a grainy textured fondant. Also beware of icing mixture - for this you want pure icing sugar if you can get it.
Heat the marshmallows in the microwave until they bubble up, remove the bowl and stir with a spatula until the mixture is smooth. Add any food colouring you like*, a tablespoon of water for every 250g of marshmallows and half the sifted icing sugar. Sifting is something I often don't bother with, but for this it prevents lumps and makes your life a lot easier. You will need more icing sugar later too, so sift more than you need at this stage.
Stir in the sugar, it should take all of it and not become too lumpy. Then add in the other half, and stir until the mixture is a weird crumbly but sticky texture (you could have added it all in one go, but it's easier if you do it in 2 lots). Don't panic, this is what it should look like ;)
Oil your hands and dust them with more icing sugar. Do the same to your work surface (use quite liberal amounts of the icing sugar or your fondant will stick to the surface) and turn out your mixture. Knead it like you would bread dough, incorporating more icing sugar until it becomes firm, is no longer sticky and resembles something like playdough (albeit with a tougher texture). If you eat a bit, it should have a firm but slightly springy texture. This might take quite a while, so be prepared to work those muscles kneading!
If you run out of icing sugar on your work surface before it loses it's stickiness, add more and keep working it.
The trouble I had was maintaining sticky-free hands - you may have to keep washing your hands, re-oiling and re-dusting them.
Once you've made the stuff, it is fine kept in a sealed container in the fridge for a couple of weeks (although I used mine within a couple of days). I'd also wrap it in gladwrap before putting it into the container, but perhaps I'm just paranoid that it'll dry out if I don't. When you want to use it, just give it a quick knead to loosen it up and return it to a more workable state.
Be prepared to get sticky everywhere, but hot water cleans up the mess relatively easily.
This stuff is great for giving a nice even covering for cakes, and can be moulded into shapes or cut like biscuit dough. If you need to stick mmf decorations to other parts of your cake, just brush one piece with a little water and you'll have no problems there ;) This also tastes so much better than the packet fondant you can get - it for some reason isn't quite as sweet and has a light texture (due to the marshmallows). You'll probably still want to seal your cake with marzipan or something similar before you cover it in mmf (otherwise you'll get moisture buildup between the fondant and the cake, making it sticky), although for the dragon cake I didn't bother as it was going to be eaten the following day anyway.
It's fun to make and you can do cool things with it! What more could you want? ;)
In a word? Sticky.
*If you use liquid food colouring, be prepared to use a lot to make a strong colour, and beware that it may give it a slightly odd taste. I've never seen anything absorb liquid colour to no effect like this stuff does. I'd suggest using a powder if you can get it though, and mix it through the melted marshmallow before you add the sugar (to give a more easily smooth colour - otherwise it'll take a very long time to knead it smooth!). If you use a liquid, also be prepared to add a lot more sugar, and don't add the water. It will make it so much more sticky than not using the colouring at all! Other options to colour it can be melted chocolate, cocoa powder and basically anything you can get your hands on ;)
Thursday, 26 April 2012
Tuesday, 24 April 2012
Playing with cakes runs in the family
So this is a bit of a cheaty post. This cake is not one I made (although I did help out with bits), rather my mother made it.
It is my elder sister's wedding cake, a traditional fruitcake with fondant flowers and piped lacework.
Flowers are white roses, Australian alpine bluebells (Wahlenbergia) and Bouvardia. The theme was navy blue and silver (hence the navy blue ribbon under the piped lace and also the use of the Whalenbergia), and the piece of lace in the arrangement on the top tier is the same as that on my sister's dress :)
Difficulty: Ridiculously hard
Anyway, pics now. Enjoy!


In a word? Astounding
Monday, 9 April 2012
In the beginning there was one cake...
Rating: Medium (some bits are easy, others hard)
So for the very first post in this shiny new blog, I've decided to make the subject that which kind of prompted its creation.
For my partner's 25th birthday, he decided to have a 5-squared party. ie a kiddie party, for which there would be a need for an awesome cake. I decided a dragon would be awesome, so decided to create the beast shown below, and will now take you through it's creation, step by step:

First, I took 2 round standard chocolate cakes (made in an approx. 23cm cake tin. I didn't measure it, so assume that's about the right size). I made them 2 days before I wanted to decorate them, wrapped them in a double-layer of clingwrap and kept them in the fridge. This makes them easier to handle, less crumbly and helps the fondant stick.
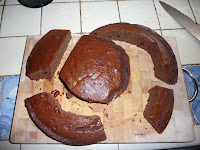
So I cut one cake in half, and set the two halves on end, back to back (see photo). This was going to be the body, so I made sure I'd used the higher cake to make it a nice fat dragon. My cake wasn't perfect, and had an uneven rise. So I used the wider part near the tail, to give it a fatter belly than chest (it worked out okay in the end). The other cake I cut into pieces to use for the head, neck, tail and legs. The wings I would worry about later.

I then carved the head into a slightly better shape. I've never done this before, so it was rather an experiment. I went for a shape similar to a cow I guess, but with a more indented forehead. I planned to finish off the shaping with the fondant anyway (sorry, don't have an individual photo of that bit). The next photos are all the bits in place:

Next I covered the whole thing in a red marshmallow fondant. I'd never used (let alone made) this stuff before, so really the whole cake was an experiment. I'll put up a recipe/directions for making mmf later perhaps. Regardless, be prepared to use a lot of food-dye if you choose to do this! It took almost half a bottle to turn it from pink to red (and even then it was a pinky-red). Another option would be to make a green dragon I guess, but I only had mixed packs of white and pink marshmallows with which to make the fondant, so rather than buy twice as many and waste the pink ones, I simply used them to make red fondant.
Also be prepared to spend a lot of time playing with fondant to create nice shapes and smooth lines on your dragon. I used lumps to fill out the legs and details on the head (such as nostrils). It turned out like this:


I filled in eyes and the yellow belly of the dragon with yellow fondant (had set aside some white for use on other parts of the dragon), and for the nostrils and spikes on the head I used black and red liquorice. It turned out really well - I was happiest with the head in the end! I also started filling in the trickier bits of the background (earth and gold coins).


Next I started on the wings, making their 'bones' out of bbq skewers, stuck together with blobs of white chocolate. This worked ok, but was more fragile than I'd intended. So next time I'd recommend covering the whole 'bone' in white choc, not just the joints. At this point you also have to decide on the position of the wings, so you can set them in the chocolate to make them rigid. I then covered the skewers in fondant, complete with liquorice claws at the joints and toes, and filled in the membranes with coloured chocolate. It doesn't take too long in the fridge to set.


Sticking the wings into the cake was tricky, but I got there in the end. Any gaps I covered with a thin piece of fondant. They weren't rigid enough for my purposes, and collapsed a bit. This was okay though, it just made it look like a resting dragon :) I also used more liquorice to stick spines the whole way along its back, and finished filling in around the dragon with earth (dessicated coconut shaken in a bag with a spoon of cocoa) and gold coins (because it's a dragon, and all dragons need to have some sort of treasure to guard!).
The last bit I did was to make some dice. As the birthday boy is a bit of a role-player, dice and dragons go together like a horse and carriage. I did indeed struggle to make D10s, I should have stuck with 6-sided dice. So the finished product!


Perhaps next time if I was better prepared the end result would have been a bit better. Slightly disappointed in the dice, as the rest of the cake worked really well... but seeing as the whole thing was an experiment in using mmf, and making dragons, I was happy with how it turned out!
A simpler cake to make than I thought, but some bits were tricky. I wouldn't mind making another now, as I know better what to do and perhaps more importantly what not to do.
In a word? Awesome!
So for the very first post in this shiny new blog, I've decided to make the subject that which kind of prompted its creation.
For my partner's 25th birthday, he decided to have a 5-squared party. ie a kiddie party, for which there would be a need for an awesome cake. I decided a dragon would be awesome, so decided to create the beast shown below, and will now take you through it's creation, step by step:

First, I took 2 round standard chocolate cakes (made in an approx. 23cm cake tin. I didn't measure it, so assume that's about the right size). I made them 2 days before I wanted to decorate them, wrapped them in a double-layer of clingwrap and kept them in the fridge. This makes them easier to handle, less crumbly and helps the fondant stick.
So I cut one cake in half, and set the two halves on end, back to back (see photo). This was going to be the body, so I made sure I'd used the higher cake to make it a nice fat dragon. My cake wasn't perfect, and had an uneven rise. So I used the wider part near the tail, to give it a fatter belly than chest (it worked out okay in the end). The other cake I cut into pieces to use for the head, neck, tail and legs. The wings I would worry about later.


I then carved the head into a slightly better shape. I've never done this before, so it was rather an experiment. I went for a shape similar to a cow I guess, but with a more indented forehead. I planned to finish off the shaping with the fondant anyway (sorry, don't have an individual photo of that bit). The next photos are all the bits in place:


Next I covered the whole thing in a red marshmallow fondant. I'd never used (let alone made) this stuff before, so really the whole cake was an experiment. I'll put up a recipe/directions for making mmf later perhaps. Regardless, be prepared to use a lot of food-dye if you choose to do this! It took almost half a bottle to turn it from pink to red (and even then it was a pinky-red). Another option would be to make a green dragon I guess, but I only had mixed packs of white and pink marshmallows with which to make the fondant, so rather than buy twice as many and waste the pink ones, I simply used them to make red fondant.
Also be prepared to spend a lot of time playing with fondant to create nice shapes and smooth lines on your dragon. I used lumps to fill out the legs and details on the head (such as nostrils). It turned out like this:


I filled in eyes and the yellow belly of the dragon with yellow fondant (had set aside some white for use on other parts of the dragon), and for the nostrils and spikes on the head I used black and red liquorice. It turned out really well - I was happiest with the head in the end! I also started filling in the trickier bits of the background (earth and gold coins).


Next I started on the wings, making their 'bones' out of bbq skewers, stuck together with blobs of white chocolate. This worked ok, but was more fragile than I'd intended. So next time I'd recommend covering the whole 'bone' in white choc, not just the joints. At this point you also have to decide on the position of the wings, so you can set them in the chocolate to make them rigid. I then covered the skewers in fondant, complete with liquorice claws at the joints and toes, and filled in the membranes with coloured chocolate. It doesn't take too long in the fridge to set.


Sticking the wings into the cake was tricky, but I got there in the end. Any gaps I covered with a thin piece of fondant. They weren't rigid enough for my purposes, and collapsed a bit. This was okay though, it just made it look like a resting dragon :) I also used more liquorice to stick spines the whole way along its back, and finished filling in around the dragon with earth (dessicated coconut shaken in a bag with a spoon of cocoa) and gold coins (because it's a dragon, and all dragons need to have some sort of treasure to guard!).
The last bit I did was to make some dice. As the birthday boy is a bit of a role-player, dice and dragons go together like a horse and carriage. I did indeed struggle to make D10s, I should have stuck with 6-sided dice. So the finished product!

Perhaps next time if I was better prepared the end result would have been a bit better. Slightly disappointed in the dice, as the rest of the cake worked really well... but seeing as the whole thing was an experiment in using mmf, and making dragons, I was happy with how it turned out!
A simpler cake to make than I thought, but some bits were tricky. I wouldn't mind making another now, as I know better what to do and perhaps more importantly what not to do.
In a word? Awesome!
Subscribe to:
Posts (Atom)